Spring Boot集成Swagger
在前后端分离的软件架构模式下,前后端程序的开发人员大多不是同一个人。这时,接口文档的重要性便体现出来了。接口文档在项目初期帮助前端开发人员快速理解接口功能,在项目后期方便维护人员对服务进行查看与维护。
一份内容详实的接口文档,可以为开发带来巨大的便利,相应地也要耗费不少心血,毕竟单是为了保持接口与文档的版本一致,所付出的努力都是难以忽视的。
相信不少前后端开发工程师都或多或少被接口文档“折磨”过。前端开发抱怨文档不够友好,后端开发烦恼于文档工作过于耗时、耗力。不过在建立了规范并将流程自动化之后,接口文档将不再是难题。
本文将介绍如何在 Spring Boot 中集成一款自动生产 API 文档的工具——Swagger。
在过去几年中,Swagger2 已经成为了定义或记录API的一种规范。之后,该规范被移至Linux基金会,并重新命名为 OpenAPI 规范。下面对 Swagger/OpenAPI 的描述,事实上指代的是同一事物。
为了在项目中整合 Swagger,首先需要添加 Swagger 的 starter 依赖。该依赖由 Spring 社区内一个非官方组织 Springfox 所维护,使用该 starter 可以方便地整合 Swagger。依赖配置如下:
http://localhost:8080/v2/api-docs 初始内容:
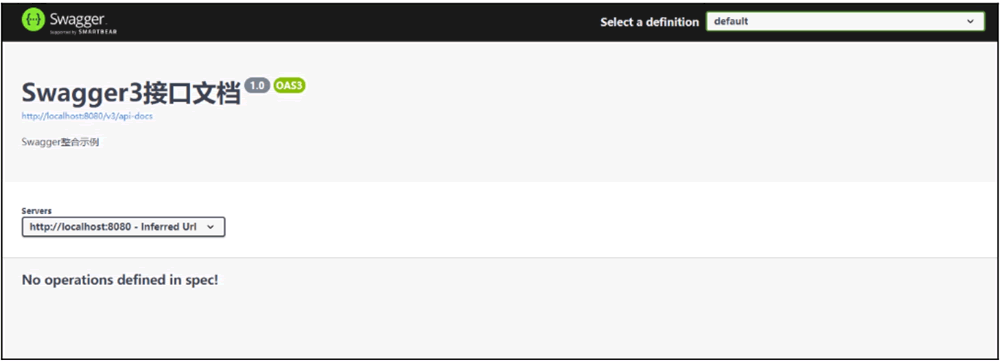
另外,在 http://localhost:8080/swagger-ui/index.html 下可以访问到用来与后端交互的接口文档界面。不过文档暂时还是空空如也,等待开发人员通过后面的操作将文档渐渐丰富起来。Swagger3 的接口文档界面如图 1 所示。

图1 Swagger3的接口文档界面
示例代码 SimpleRestController.java:
声明:《Java系列教程》为本站“54笨鸟”官方原创,由国家机构和地方版权局所签发的权威证书所保护。
一份内容详实的接口文档,可以为开发带来巨大的便利,相应地也要耗费不少心血,毕竟单是为了保持接口与文档的版本一致,所付出的努力都是难以忽视的。
相信不少前后端开发工程师都或多或少被接口文档“折磨”过。前端开发抱怨文档不够友好,后端开发烦恼于文档工作过于耗时、耗力。不过在建立了规范并将流程自动化之后,接口文档将不再是难题。
本文将介绍如何在 Spring Boot 中集成一款自动生产 API 文档的工具——Swagger。
Swagger/OpenAPI规范
Swagger 是一个开源项目,主要用于 RESTful API 的描述与调试。集成了一组 HTML、JavaScript 和 CSS 前端资源,从符合 Swagger 规范的 API 中动态生成可以交互的接口文档。在过去几年中,Swagger2 已经成为了定义或记录API的一种规范。之后,该规范被移至Linux基金会,并重新命名为 OpenAPI 规范。下面对 Swagger/OpenAPI 的描述,事实上指代的是同一事物。
为了在项目中整合 Swagger,首先需要添加 Swagger 的 starter 依赖。该依赖由 Spring 社区内一个非官方组织 Springfox 所维护,使用该 starter 可以方便地整合 Swagger。依赖配置如下:
<dependency>
    <groupId>io.springfox</groupId>
    <artifactId>springfox-boot-starter</artifactId>
    <version>3.0.0</version>
</dependency>
生成接口文档
接口文档的生成,依赖于 Docket。为了生成一份接口文档,需要在 Spring Boot 程序中配置一个 Docket 的 Java Bean。得益于 Swagger 的合理设计,需要配置的内容并不复杂。在路径 /src/main/java/com/example/myblog/config 下创建 SwaggerConfig.java:示例
@EnableOpenApi
@Configuration
public class SwaggerConfig {
    @Bean
    public Docket createRestApi() {
        return new Docket(DocumentationType.OAS_30)
                .apiInfo(apiInfo())
                .select()
                //使用@ApiOperaion的Controller将被添加至接口文档当中
                .apis(RequestHandlerSelectors.withMethodAnnotation(ApiOperation.class))
                .paths(PathSelectors.any())
                .build();
    }

    private ApiInfo apiInfo() {
        return new ApiInfoBuilder().title("Swagger3 接口文档").description("Swagger 整合示例").version("1.0").build();
    }
}
创建好 Swagger 配置之后,可以分别在路径 http://localhost:8080/v2/api-docs 与 http://localhost:8080/v3/api-docs 下访问到 Swagger2 规范的接口文档与 OpenAPI3 的接口文档。http://localhost:8080/v2/api-docs 初始内容:
{
"swagger": "2.0",
"info": {
"description": "Swagger 整合示例",
"version": "1.0",
"title": "Swagger3 接口文档"
},
"host": "localhost:8080",
"basePath": "/"
}
{
"openapi": "3.0.3",
"info": {
"title": "Swagger3 接口文档",
"description": "Swagger 整合示例",
"version": "1.0"
},
"servers": [
{
"url": "http://localhost:8080","description":"Inferred Url"
}
],
"components": {
}
}
另外,在 http://localhost:8080/swagger-ui/index.html 下可以访问到用来与后端交互的接口文档界面。不过文档暂时还是空空如也,等待开发人员通过后面的操作将文档渐渐丰富起来。Swagger3 的接口文档界面如图 1 所示。

图1 Swagger3的接口文档界面
使用注解生成文档内容
无论是 api-doc 还是 swagger-ui,这两者的内容都依赖于开发者在代码中通过 Swagger 提供的注解进行完善。1)@Api注解
用于Controller类上,将该类标记为Swagger的资源。常用参数如下:- tags:说明该类的作用,参数类型为String数组。
2)@ApiOperation注解
用于接口方法上,描述针对特定路径下的操作。常用参数如下:- value:方法的用途和作用。
- notes:方法的注意事项和备注。
3)@ApiModel注解
用于实体类上,描述实体作用。常用参数如下:- description:描述实体的作用。
4)@ApiModelProperty注解
用于实体属性上,描述实体的属性。常用参数如下:- value:对属性的简要描述。
- name:属性名。
- required:参数是否是必选的。
5)@ApiImplicitParam注解
用于方法,描述隐含的参数。常用参数如下:- name:参数名。
- value:参数说明。
- dataType:数据类型。
- paramType:用于描述参数的类型(参数所处位置)。可选内容包括:path、query、body、header、form。
6)@ApiImplicitParams注解
用于方法上,包含多个 @ApiImplicitParam。7)@ApiParam注解
用于方法、参数,用于描述请求的要求和说明。常用参数如下:- name:参数名。
- value:对参数的简要描述。
- defaultValue:参数默认值。
- required:参数是否是必选的。
8)@ApiResponse注解
用于请求的方法上,描述不同的响应。常用参数如下:- code:表示响应的状态码。
- message:描述状态码对应的响应信息。
9)@ ApiResponses注解
用于方法上,包含多个@ ApiResponse。示例代码 SimpleRestController.java:
@Api(tags = "RESTful 服务传参示例")
@RestController
@RequestMapping("/api/simple")
public class SimpleRestController {
    @ApiOperation(value = "无参GET请求", notes = "用于演示通过无参GET请求的形式对接口进行请求")
    @GetMmpping("/no-param")
    public Result<String> noParam() {
        //无参
        return Result.ok("No parameter.");
    }

    @ApiOperation(value = "单个参数的GET请求", notes = "用于演示通过单参数GET请求的形式对接口进行请求")
    @ApilmplicitParam(name = "implicit", value = "提供隐含参数的输入方式")
    @GetMapping(path = "/single-param", params = "implicit")
    public Result<String> singleParam(@ApiParam(name = "单参数") String param) {
        //单个可选参数
        return Result.ok("The parameter is:" + param);
    }

    @ApiOperation(value = "下一个生日", notes = "输入出生年、月、日,计算到下一个生日的天数")
    @ApiResponses({
            @ApiResponse(code = 400, message = "输入日期大于当前日期"),
            @ApiResponse(code = 200, message = "成功")
    })
    @GetMmpping("/next-birth-day / {year} / {month} / {day}")
    public ResponseEntity<Result<Long>> nextBirthday(@PathVariable int year, @Pathvariable int month, @PathVArimble int day) {
        LocalDate birthDate = LocalDate.of(year, month, day);
        if (birthDate.isAfter(LocalDate.now())) {
            return new ResponseEntity<>(null, HttpStatus.BAD_REQUEST);
        }
        LocalDate nextBirthDay = LocalDate.of(LocalDate.now().getYear(), birthDate.getMonth(), birthDate.getDayOfMonth());
        if (nextBirthDay.isBefore(LocalDate.now())) {
            nextBirthDay = nexBirthDay.plusYears(1);
        }
        return new ResponseEntity<>(Result.ok(DAYS.between(LocalDate.now(), nextBirthDay)), HttpStatus.OK);
    }
    //省略若干方法……
}
示例代码Result.java:
@ApiModel(description = "用于统一RESTful服务返回内容")
@Accessors(chain = true)
@Setter
@Getter
public class Result<T> {
    @ApiModelProperty("业务状态码")
    private int code;
    @ApiModelProperty("响应内容")
    private T data;
    @ApiModelProperty("错误信息")
    private String message;

    private final static int SUCCESS = 0;
    private final static int FAIL = -1;

    public static <T> Result<T> ok(T data) {
        return new Result<T>().setCode(SUCCESS).setData(data);
    }

    public static <T> Result<T> failed(String message) {
        retum new Result<T>().setCode(FAIL).setMessage(message);
    }
}
声明:《Java系列教程》为本站“54笨鸟”官方原创,由国家机构和地方版权局所签发的权威证书所保护。
 ICP备案:
 公安联网备案: